

Burp Suite is a graphical tool and integrated platform for performing application security testing. Its numerous tools work in unison to assist the entire testing process, from mapping and analyzing an application's attack surface to detecting and exploiting security vulnerabilities.
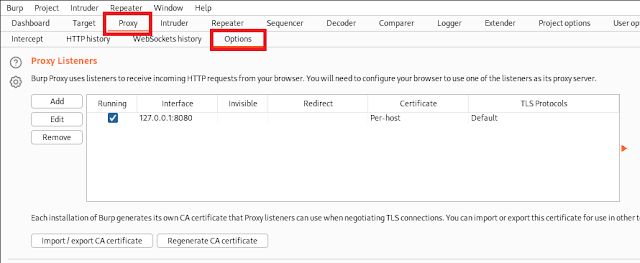
From our previous blog, we were redirected to Dashboard and used BurpSuite's Chromium Browser. Now let's set up the proxy so Burp can intercept and capture the browser's request. Go to the Proxy tab and then to the Options tab. There, you'll find the IP address 127.0.0.1 and port 8080, which are the default configuration.
STEP 1: CONFIGURE BURPSUITE
- Click on Add, under Proxy Listeners.
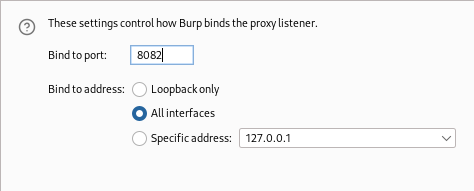
- In the Binding tab, set Bind to Port to 8082 (or port that is not in use).
- You can select All Interfaces or Choose the Interface by selecting Specific Address.
|
| Binding All Interfaces |

|
| Binding on Selected IP Address |
- Click on Yes, when prompted.
STEP 2: CONFIGURE MOBILE DEVICES
-
Go to settings
in your device and select
the Wi-Fi you are connected to.
-
For iOS,
-
You need to touch the small i next to Wi-Fi you are using.
-
Go to Configure Proxy.
-
For Android,
-
Just touch the Wi-Fi name.
-
Find Configure Proxy option. It might be available under
Advance.
-
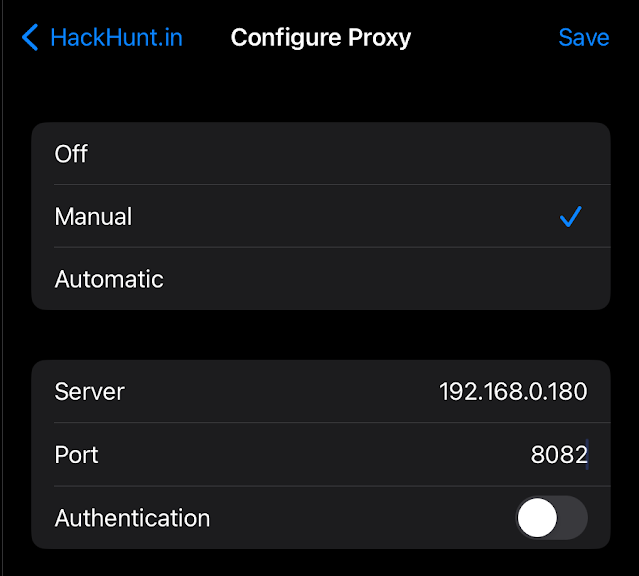
Set Server to the IP Address of the commuter that is running Burp Suite, in
our example 192.168.0.180.
-
Set Port to the port value that you configured for the Burp Proxy, in
our example 8082.
-
Touch Save.
- For iOS,
- You need to touch the small i next to Wi-Fi you are using.
- Go to Configure Proxy.
- For Android,
- Just touch the Wi-Fi name.
- Find Configure Proxy option. It might be available under Advance.

STEP 3: INSTALLING A CA CERTIFICATE
In order to interact with HTTPS traffic, you need to install a CA
certificate. Make sure Burp Suite is running on your computer.
To install the CA Certificate to your iOS device:
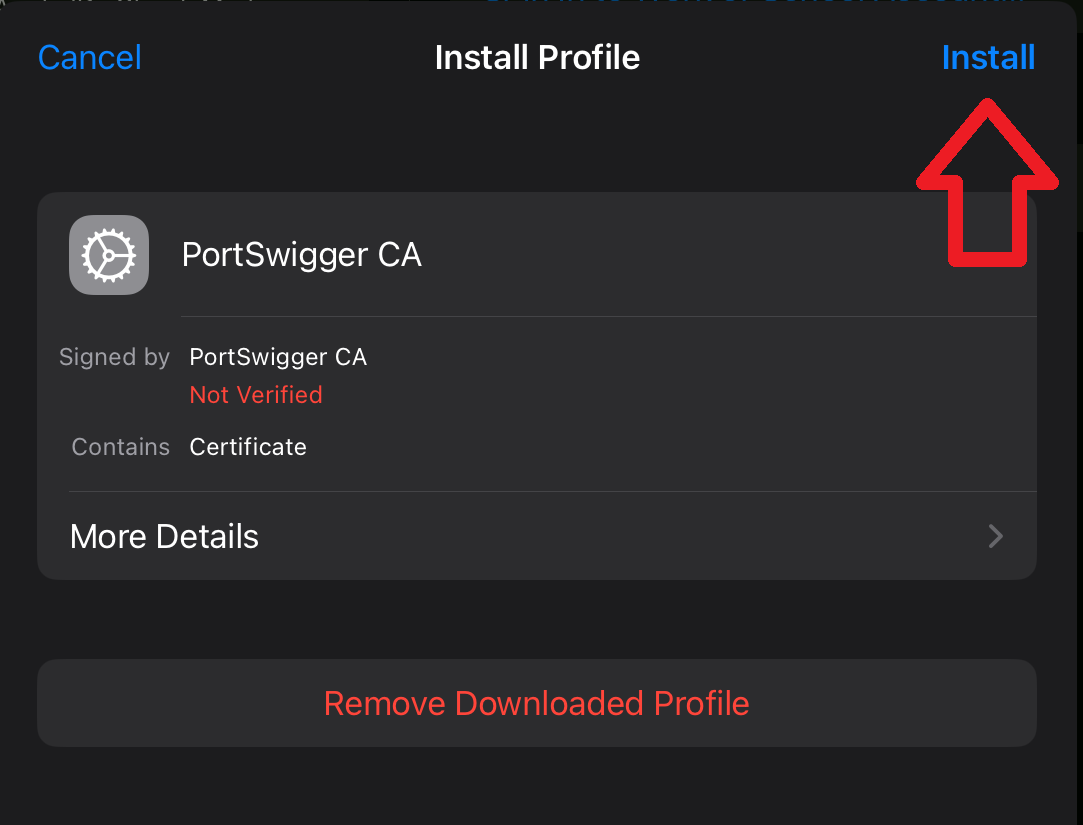
- Use the SAFARI browser to go to http://burpsuite and select CA Certificate.

- After downloading, go to Settings. Select, Profile Download and select CA Certificate.

- On the Install Profile, select Install.
- When the profile is installed, select Done.

- Go to Settings > General > About > Certificate Trust Settings.
- Activate the toggle switch for PortSwiggerr CA.

To install the certificate on your Android device:
- This step is complicated and it varies across devices and versions of Android.
- In addition, you need to make further configuration changes in order to proxy HTTPS traffic from a Chrome browser that's at version 99 or above.
- Note that, if you install the certificate directly it may be a chance that it will be installed for the USER and not the SYSTEM. Therefore, the proxy will only work for the Browser and the Applications. That is why, following the below steps to install the certificate is necessary. Although, some device allows you to install the certificate as ROOT if that is the case you do not have to follow the below steps.
- For further information on how to perform these steps, you can refer to the following external links. Please note that we're not responsible for the content of these pages:
You might be interested in,
- Introduction and Installation of BurpSuite
- Configure BurpSuite Proxy for Web Application
- Fuzzing via BurpSuite
We hope this helps. If any suggestions or doubts you can add a comment and
we will reply as soon as possible.

%20Cover.jpg)


No comments:
Post a Comment