

Forensic Toolkit, or FTK, is a computer forensics open-source software made by
AccessData. It searches a hard drive for different types of data. For
instance, it might be able to find deleted emails and search a disc for text
strings to use as a dictionary of passwords to break encryption.
Process
- Go to File from the top left corner and click on,
- Add Evidence Item - If you would like to add a specific drive or hardware.
- Add All Attach Device - If you would like to work with the whole system.

- Considering, you have selected Create Disk Image..., you will be asked to Select the Source Evidence Type.

- The first step is to identify the source type that you want to work on.
- A Physical Drive is the primary storage hardware or the component within a device, which is used to store, retrieve, and organize data.
- A Logical Drive is generally a drive space that is created over a physical hard disk. A logical drive has its parameters and functions because it operates independently.
- Select an Image File to view an image file you created before
- Contents of a Folder, to look at a specific folder.
- Femico Device is ideal for creating images of multiple CDs or DVDs with the same parameters.
- We then have a choice of the physical drives that are currently visible based on the physical drive that we previously chose, so we choose the USB drive.

- Here is where you can specify where the image will be created. In order to do a hash value check on the image file, we always select Verify Images once they are created. You can also create directory listings of every file in the image, but be aware that this will result in an enormous listing for a typical hard drive with hundreds of thousands of entries.

- Click on Add... and you will see Select Image Type.
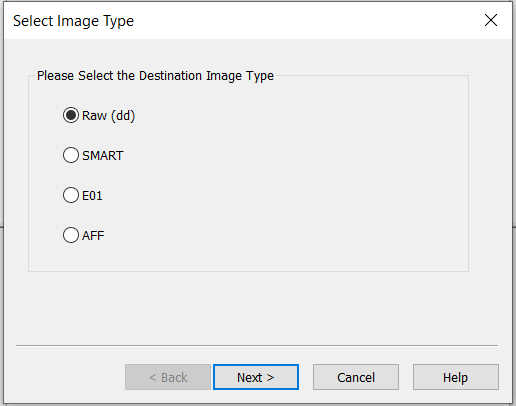
- This indicates the type of image file that will be created.
- Raw (dd) - DD stands for disk duplicator. It is a bit-for-bit replica of the original, whilst the other three options are made to work with a particular forensics application.
- Typically use Raw or E01, which is an EnCase forensic image file format. In this example, we’re using Raw.
- The next step is Evidence Item Information. The important details about the evidence item you are about to create can be entered here to help with documenting the item. Once the image is finished, this data will be recorded as part of the image summary data.

- Now, Select Image Destination. You need to give a destination where you need to save the image file and a name for the image file.
- When you want to split a bigger image file into multiple pieces, the Image Fragment Size setting shows the size of each fragment.
- Compression shows the degree of compression of the Image file. From 0 (no compression) to 9 (highest compression, which slows down the process of images). Compression is always 0 for raw, uncompressed images.
- Using AD Encryption indicates whether to encrypt the image or not. It is best practice to select don’t select that, instead put the image on an encrypted drive (when encryption is desired).

- When you click Finish, the image generation process will start, and a dialogue box will appear throughout. No matter how many files are currently stored on the device, it will take the same amount of time because it is a bit-by-bit image of the device. The amount of time depends on the size of the Device.

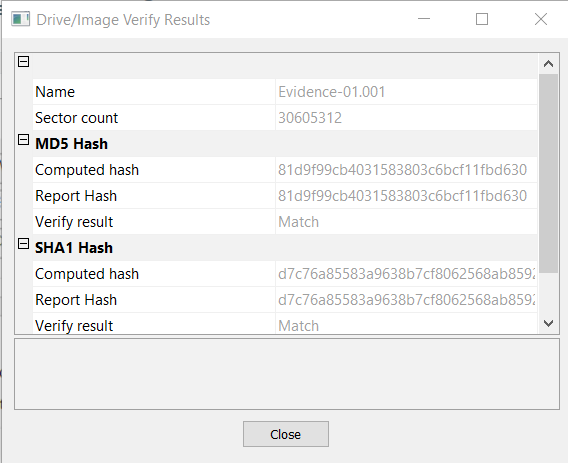
- Once the process is done, the next popup will be Drive/Image Verify Results. This shows the name of the image file, the sector count, computed (before image creation) and reported (after image creation) MD5 and SHA1 hash values with a confirmation that they match and a list of bad sectors (if any).
- Once the process is done, you will see an option in the bottom left corner of Creating Image... name Image Summary. This shows the summary of the image that is created, including the evidence item information, drive information, hash verification information, etc. This information is also saved as a text file.

- If you have selected Create directory listing of all files in the image, a CSV file is created, which has those details.
We hope this helps. If any suggestions or doubts you can add a comment and we
will reply as soon as possible.
%20Cover.jpg)

%20Cover.jpg)


No comments:
Post a Comment